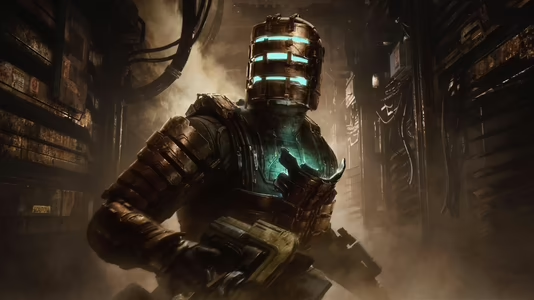
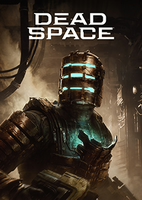
Dead Space
47 Achievements
EA Play
Marked
Pick up a Marker fragment for the first time. Details for this achievement will be revealed once unlocked
How to unlock the Marked achievement in Dead Space - Definitive Guide
 BabyishDuck
  TrueAchievements
TrueAchievements
Dead Space Remake Marker Fragments Locations Guide
In total there are 12 Marker collectibles to find. They can only be gotten in New Game Plus, on any difficulty.Chapter 1: New Arrivals

Chapter 2: Intensive Care


Chapter 3: Course Correction


Chapter 4: Obliteration Imminent


Chapter 5: Lethal Devotion


Chapter 6: Environmental Hazard


Chapter 7: Into the Void


Chapter 8: Search and Rescue


Chapter 10: End of Days


Chapter 11: Alternate Solutions


Where To Place The Marker Fragments


After this is done, you can continue with the story. After defeating the final boss, the achievement will unlock in the next cutscene.
If you're still having trouble, feel free to use this video as a reference showing all locations.
Hope this helped, thanks again.
10 Comments
Just a note: Marker #10 is in the Deluxe Quarters not in the Deluxe Shift Bunks.
By DanTheWhale on 07 Feb 2023 06:00
Cheers for this, have updated.
By BabyishDuck on 07 Feb 2023 18:59
 BabyishDuck
 TrueAchievements
TrueAchievements
Dead Space Remake Marker Fragments Locations Guide
In total there are 12 Marker collectibles to find. They can only be gotten in New Game Plus, on any difficulty.Chapter 1: New Arrivals
Chapter 2: Intensive Care
Chapter 3: Course Correction
Chapter 4: Obliteration Imminent
Chapter 5: Lethal Devotion
Chapter 6: Environmental Hazard
Chapter 7: Into the Void
Chapter 8: Search and Rescue
Chapter 10: End of Days
Chapter 11: Alternate Solutions
Where To Place The Marker Fragments
After this is done, you can continue with the story. After defeating the final boss, the achievement will unlock in the next cutscene.
If you're still having trouble, feel free to use this video as a reference showing all locations.
Hope this helped, thanks again.
10 Comments
Just a note: Marker #10 is in the Deluxe Quarters not in the Deluxe Shift Bunks.
By DanTheWhale on 07 Feb 2023 06:00
Cheers for this, have updated.
By BabyishDuck on 07 Feb 2023 18:59
 MIKE1989TW
 TrueAchievements
TrueAchievements
This achievement is unlocked for collecting one of the twelve Marker Fragments in the game. Full completion is required for the Reunion achievement, which has a separate guide. For ease, I have brought my guide here.
The achievement requires twelve Fragments and Assembly. I will not spoil the surprise, only explain how to do it.
You cannot complete this achievement on your first playthrough, it can only be done in New Game Plus.
There are 12 Marker Fragments you need to find throughout the game, place them in the Captains Quarters to activate the ending and then complete the game.
All Marker Fragments have a purple glow, allowing you to more easily identify them from a distance.
They do not need to be collected sequentially and you can return at anytime to collect them, providing you haven’t left the USG Ishimura (point of no return).
If you collect a Marker Fragment and then die, and the game returns you to a checkpoint/save which is before the time you collected the Fragment, you will need to collect it again. This also applies to Marker Assembly.
It is worth creating a second precautionary save slot before you leave the USG Ishimura, so that you can return to a point where you can fix any potential errors without needing to start again.
Marker Fragments can be tracked by opening your RIG and selecting to Show Key Items. By cross referencing with the Fragments listed below, you can backtrack to find any you may have missed.
Regarding the tracking, there is a flaw with the DS1 controller setup; is the key to open and close your RIG, but also to open Show Key Items. Instead it closes the RIG and you will need to temporarily change your controller setup to view them, so make sure you’re in a safe location before switching!
Please take reference of the room names used in this guide. They will help to track your own location and can be found above nearly any door you walk through.
During Chapter 1 you will need to repair the tram. This consists of 2 parts: retrieving the data board and replacing the tram. When you go for the data board you’ll enter the Maintenance Bay and then the Maintenance Office, where the data board is located. The first fragment is located on a shelf; melee the shelf and collect the fragment.
RIG Description/Backtracking:


During Chapter 2 you will need to find a Shock Pad in the Research Wing. Enter the area and the room will go into Lockdown. Clear the upper floor, take the elevator down and clear the lower floor. There are 3 accessible rooms: from the elevator, to the left is Dr N. Brennan’s office, your route to the right and directly ahead is Dr T. Kyne’s office. Enter Kyne’s office and you’ll notice the bookshelf in the corner can be partially seen through. Use Kinesis to slide the bookshelf out the way and collect the fragment inside.
RIG Description/Backtracking:


Continue through the level, beyond repairing the the centrifuge and entering the third area (through the circular door in the main Engineering hub). Proceed down a series of elevators, though a spasming door at the bottom and onward to the Engine Room. At the back of the room behind the second engine that you must replace a power cell into is a fragment, collect it.
RIG Description/Backtracking:


After speaking to Hammond in the Captains Nest, leave and kill the Brute. You will enter an elevator and complete the tasks on floor 2 and then return to the elevator to head to floor 3. Once here, leave the elevator go through the first and only door, and then enter the first door on the right that you come to. This is named the Break Room; the fragment is between the door you entered from and the screen on the wall.
RIG Description/Backtracking:


Progress through the level and find the source of the broadcast, and continue until you are required to end the lockdown. This will take you through the Emergency Room, through Intensive Care Unit and into Dr C. Mercer’s office. You are required to enter Mercer’s office to continue the storyline but the fragment is on the desk.
RIG Description/Backtracking:


Towards the end of the chapter, you will be confronted with the Hunter (regenerative Necromorph) that you will need to place in Cryofreeze. Rather than picking up the Liquid Nitrogen and triggering the next sequence, head around the chamber in the middle of the room to the side which is closest to the right of the two single doors. Look above the chamber and collect the fragment with your Kinesis.
If you have triggered the Hunter sequence, freeze it and then re-enter the room to collect the fragment (all other Necromorphs will flee).
RIG Description/Backtracking:


This fragment is highly missable during the chapter.
Progress through the level dispatching the Wheezers in the West Grow Chamber. Once done, you will need to enter the East Grow Chamber from the second floor. There is a room between the two chambers that has a Wheezer and a Tentacle that must be destroyed to give you access to the East Grow Chamber. As soon as you enter the East Grow Chamber, immediately look far to the right and up, beyond the pillar in front of you is the fragment; use Kinesis to collect it.
You can collect the fragment whilst in Zero Gravity, but it may not be as easy to locate.
RIG Description/Backtracking:


This fragment is missable during the Chapter, simply because of the route the storyline wishes you to take.
Progress though Mining and complete Deck C. You will then return to the elevator and travel to Deck B: Processing. Clear the first room and enter the Mineral Processing Area. There will be a Store on the right at the end of the corridor and a room named Mineral Samples. You cannot enter this room because you need Clearance Level 3. Proceed into the next area, dispose of the 4 “anomalies” and dispatch the enemies. Then travel into Mineral Processing Control and collect Dallas’ RIG. This will give you Clearance Level 3. Although you can proceed and ultimately return to the area with the Store, be safe and backtrack the two rooms to Mineral Samples. The fragment is on the desk.
RIG Description/Backtracking:


Proceed through the level until you reach the Communications Control Room and then enter the Communications Array. This is where you need to realign the array to broadcast a signal. Dispatch the enemies and then look directly at the screen which shows where your antennas are positioned. Then look to the left and you’ll see a flesh covered wall. Use your gravity boots to travel up to the fragment.
RIG Description/Backtracking:


This fragment is missable during the Chapter, if you do not enter the area you unlocked.
Progress through the level, destroying the first Tendril in the Standard Quarters and then take the lift to the Central Nexus where you have an unfriendly chat with Dr C. Mercer. Flee the Hunter, pass through the Mess Hall and into the Deluxe Suites. This is where you need to destroy the second Tendril.
Upon entering, you will notice that many of the doors are without power. Enter the corridor and then into the Deluxe Quiet Bunks and pick up the power cell. Exit the room and place the cell in the source at the end of the corridor beyond the Deluxe Guest Suite. Then override its controls to allow access to all doors. Return down the corridor and pass through the first door you used to access the corridor you’re in. The doors on the opposite side of the rectangular room will now be open. Enter the left of the two doors and find the fragment on a desk to your left.
RIG Description/Backtracking:


Continuing on from Fragment 10, you will need to enter the Executive Suite and then return to the Central Nexus to access Chief Stewards Office. Enter and speak with Dr T. Kyne. When the conversation is over, he will leave allowing you access to the room he was in through a door to the left. Enter and the fragment is on a table directly ahead of you.
RIG Description/Backtracking:


At the start of the chapter you will need to travel back to Hanger/Cargo/Tram Control on the tram. The first order of business is to enter the Cargo Bay to raise the Marker. When you enter the Cargo Bay, there will be a Bench to your left and an elevator to your right. Take the elevator down. The fragment is located on the opposite and diagonal end of the room. As the room is large, but simply rectangular in nature, head to the left as far as you can go, and then turn 90 degrees right and run as far as you can go. The fragment is on a shelf.
RIG Description/Backtracking:


Now you have all 12 Marker Fragments, complete the Cargo Bay area. The story will return you to the tram station but wants you to continue to Flight Lounge; instead, jump back on the tram and travel to Crew Quarters. Move through into the main area that has the store and use the elevator directly opposite to return to the Central Nexus (floor 1). Now enter the room and use the other elevator in the middle of the room to go up one floor. Then skirt all the way around, past the store and save station, and enter the Executive Quarters. After the next two short corridors, enter the first door on your left named Captain B. Mathias.


On the table will be a Marker with 12 candles around it. There will also be a console at the table which will ask whether you would like to “Inspect?”. Yes please. If you have successfully found all the Marker Fragments, the 12 candles will have a Marker symbol for a flame. Now, just complete the game as normal and enjoy the alternative ending.


Open your RIG and select Show Key Items, and cross reference your Fragments with the RIG Description/Backtracking for each one listed above. Once you have identified which ones are missing, return to collect them. When you have all 12 Marker Fragments, return to the Captains Quarters and inspect the console again. Any candles that were missing a symbol should now have one and you are free to continue the game as mentioned above.
I hope this guide is of use to you; if it has been, please click like because this took over 20 hours to figure out, compile and write!
Good luck!
The achievement requires twelve Fragments and Assembly. I will not spoil the surprise, only explain how to do it.
Overview.
You cannot complete this achievement on your first playthrough, it can only be done in New Game Plus.
There are 12 Marker Fragments you need to find throughout the game, place them in the Captains Quarters to activate the ending and then complete the game.
All Marker Fragments have a purple glow, allowing you to more easily identify them from a distance.
They do not need to be collected sequentially and you can return at anytime to collect them, providing you haven’t left the USG Ishimura (point of no return).
If you collect a Marker Fragment and then die, and the game returns you to a checkpoint/save which is before the time you collected the Fragment, you will need to collect it again. This also applies to Marker Assembly.
It is worth creating a second precautionary save slot before you leave the USG Ishimura, so that you can return to a point where you can fix any potential errors without needing to start again.
Marker Fragments can be tracked by opening your RIG and selecting
Regarding the tracking, there is a flaw with the DS1 controller setup;
Please take reference of the room names used in this guide. They will help to track your own location and can be found above nearly any door you walk through.
Fragment 1. Chapter 1: New Arrivals.
During Chapter 1 you will need to repair the tram. This consists of 2 parts: retrieving the data board and replacing the tram. When you go for the data board you’ll enter the Maintenance Bay and then the Maintenance Office, where the data board is located. The first fragment is located on a shelf; melee the shelf and collect the fragment.
RIG Description/Backtracking:
Fragment 2. Chapter 2: Intensive Care.
During Chapter 2 you will need to find a Shock Pad in the Research Wing. Enter the area and the room will go into Lockdown. Clear the upper floor, take the elevator down and clear the lower floor. There are 3 accessible rooms: from the elevator, to the left is Dr N. Brennan’s office, your route to the right and directly ahead is Dr T. Kyne’s office. Enter Kyne’s office and you’ll notice the bookshelf in the corner can be partially seen through. Use Kinesis to slide the bookshelf out the way and collect the fragment inside.
RIG Description/Backtracking:
Fragment 3. Chapter 3: Course Correction.
Continue through the level, beyond repairing the the centrifuge and entering the third area (through the circular door in the main Engineering hub). Proceed down a series of elevators, though a spasming door at the bottom and onward to the Engine Room. At the back of the room behind the second engine that you must replace a power cell into is a fragment, collect it.
RIG Description/Backtracking:
Fragment 4. Chapter 4: Obliteration Imminent.
After speaking to Hammond in the Captains Nest, leave and kill the Brute. You will enter an elevator and complete the tasks on floor 2 and then return to the elevator to head to floor 3. Once here, leave the elevator go through the first and only door, and then enter the first door on the right that you come to. This is named the Break Room; the fragment is between the door you entered from and the screen on the wall.
RIG Description/Backtracking:
Fragment 5. Chapter 5: Lethal Devotion.
Progress through the level and find the source of the broadcast, and continue until you are required to end the lockdown. This will take you through the Emergency Room, through Intensive Care Unit and into Dr C. Mercer’s office. You are required to enter Mercer’s office to continue the storyline but the fragment is on the desk.
RIG Description/Backtracking:
Fragment 6. Chapter 5: Lethal Devotion.
Towards the end of the chapter, you will be confronted with the Hunter (regenerative Necromorph) that you will need to place in Cryofreeze. Rather than picking up the Liquid Nitrogen and triggering the next sequence, head around the chamber in the middle of the room to the side which is closest to the right of the two single doors. Look above the chamber and collect the fragment with your Kinesis.
If you have triggered the Hunter sequence, freeze it and then re-enter the room to collect the fragment (all other Necromorphs will flee).
RIG Description/Backtracking:
Fragment 7. Chapter 6: Environmental Hazards.
This fragment is highly missable during the chapter.
Progress through the level dispatching the Wheezers in the West Grow Chamber. Once done, you will need to enter the East Grow Chamber from the second floor. There is a room between the two chambers that has a Wheezer and a Tentacle that must be destroyed to give you access to the East Grow Chamber. As soon as you enter the East Grow Chamber, immediately look far to the right and up, beyond the pillar in front of you is the fragment; use Kinesis to collect it.
You can collect the fragment whilst in Zero Gravity, but it may not be as easy to locate.
RIG Description/Backtracking:
Fragment 8. Chapter 7: Into the Void.
This fragment is missable during the Chapter, simply because of the route the storyline wishes you to take.
Progress though Mining and complete Deck C. You will then return to the elevator and travel to Deck B: Processing. Clear the first room and enter the Mineral Processing Area. There will be a Store on the right at the end of the corridor and a room named Mineral Samples. You cannot enter this room because you need Clearance Level 3. Proceed into the next area, dispose of the 4 “anomalies” and dispatch the enemies. Then travel into Mineral Processing Control and collect Dallas’ RIG. This will give you Clearance Level 3. Although you can proceed and ultimately return to the area with the Store, be safe and backtrack the two rooms to Mineral Samples. The fragment is on the desk.
RIG Description/Backtracking:
Fragment 9. Chapter 8: Search and Rescue.
Proceed through the level until you reach the Communications Control Room and then enter the Communications Array. This is where you need to realign the array to broadcast a signal. Dispatch the enemies and then look directly at the screen which shows where your antennas are positioned. Then look to the left and you’ll see a flesh covered wall. Use your gravity boots to travel up to the fragment.
RIG Description/Backtracking:
Fragment 10. Chapter 10: End of Days.
This fragment is missable during the Chapter, if you do not enter the area you unlocked.
Progress through the level, destroying the first Tendril in the Standard Quarters and then take the lift to the Central Nexus where you have an unfriendly chat with Dr C. Mercer. Flee the Hunter, pass through the Mess Hall and into the Deluxe Suites. This is where you need to destroy the second Tendril.
Upon entering, you will notice that many of the doors are without power. Enter the corridor and then into the Deluxe Quiet Bunks and pick up the power cell. Exit the room and place the cell in the source at the end of the corridor beyond the Deluxe Guest Suite. Then override its controls to allow access to all doors. Return down the corridor and pass through the first door you used to access the corridor you’re in. The doors on the opposite side of the rectangular room will now be open. Enter the left of the two doors and find the fragment on a desk to your left.
RIG Description/Backtracking:
Fragment 11. Chapter 10: End of Days.
Continuing on from Fragment 10, you will need to enter the Executive Suite and then return to the Central Nexus to access Chief Stewards Office. Enter and speak with Dr T. Kyne. When the conversation is over, he will leave allowing you access to the room he was in through a door to the left. Enter and the fragment is on a table directly ahead of you.
RIG Description/Backtracking:
Fragment 12. Chapter 11: Alternate Solutions.
At the start of the chapter you will need to travel back to Hanger/Cargo/Tram Control on the tram. The first order of business is to enter the Cargo Bay to raise the Marker. When you enter the Cargo Bay, there will be a Bench to your left and an elevator to your right. Take the elevator down. The fragment is located on the opposite and diagonal end of the room. As the room is large, but simply rectangular in nature, head to the left as far as you can go, and then turn 90 degrees right and run as far as you can go. The fragment is on a shelf.
RIG Description/Backtracking:
Marker Assembly.
Now you have all 12 Marker Fragments, complete the Cargo Bay area. The story will return you to the tram station but wants you to continue to Flight Lounge; instead, jump back on the tram and travel to Crew Quarters. Move through into the main area that has the store and use the elevator directly opposite to return to the Central Nexus (floor 1). Now enter the room and use the other elevator in the middle of the room to go up one floor. Then skirt all the way around, past the store and save station, and enter the Executive Quarters. After the next two short corridors, enter the first door on your left named Captain B. Mathias.
On the table will be a Marker with 12 candles around it. There will also be a console at the table which will ask whether you would like to “Inspect?”. Yes please. If you have successfully found all the Marker Fragments, the 12 candles will have a Marker symbol for a flame. Now, just complete the game as normal and enjoy the alternative ending.
IF you have inspected the console and one or more of the 12 candles does not have a Marker symbol, the alternative ending will not be triggered. Not to worry, this can be rectified providing you do not leave the USG Ishimura (point of no return).
Open your RIG and select Show Key Items, and cross reference your Fragments with the RIG Description/Backtracking for each one listed above. Once you have identified which ones are missing, return to collect them. When you have all 12 Marker Fragments, return to the Captains Quarters and inspect the console again. Any candles that were missing a symbol should now have one and you are free to continue the game as mentioned above.
I hope this guide is of use to you; if it has been, please click like because this took over 20 hours to figure out, compile and write!
Good luck!
MIKE1989TW TrueAchievements
TrueAchievements
This achievement is unlocked for collecting one of the twelve Marker Fragments in the game. Full completion is required for the Reunion achievement, which has a separate guide. For ease, I have brought my guide here.
The achievement requires twelve Fragments and Assembly. I will not spoil the surprise, only explain how to do it.
You cannot complete this achievement on your first playthrough, it can only be done in New Game Plus.
There are 12 Marker Fragments you need to find throughout the game, place them in the Captains Quarters to activate the ending and then complete the game.
All Marker Fragments have a purple glow, allowing you to more easily identify them from a distance.
They do not need to be collected sequentially and you can return at anytime to collect them, providing you haven’t left the USG Ishimura (point of no return).
If you collect a Marker Fragment and then die, and the game returns you to a checkpoint/save which is before the time you collected the Fragment, you will need to collect it again. This also applies to Marker Assembly.
It is worth creating a second precautionary save slot before you leave the USG Ishimura, so that you can return to a point where you can fix any potential errors without needing to start again.
Marker Fragments can be tracked by opening your RIG and selecting to Show Key Items. By cross referencing with the Fragments listed below, you can backtrack to find any you may have missed.
Regarding the tracking, there is a flaw with the DS1 controller setup; is the key to open and close your RIG, but also to open Show Key Items. Instead it closes the RIG and you will need to temporarily change your controller setup to view them, so make sure you’re in a safe location before switching!
Please take reference of the room names used in this guide. They will help to track your own location and can be found above nearly any door you walk through.
During Chapter 1 you will need to repair the tram. This consists of 2 parts: retrieving the data board and replacing the tram. When you go for the data board you’ll enter the Maintenance Bay and then the Maintenance Office, where the data board is located. The first fragment is located on a shelf; melee the shelf and collect the fragment.
RIG Description/Backtracking:
During Chapter 2 you will need to find a Shock Pad in the Research Wing. Enter the area and the room will go into Lockdown. Clear the upper floor, take the elevator down and clear the lower floor. There are 3 accessible rooms: from the elevator, to the left is Dr N. Brennan’s office, your route to the right and directly ahead is Dr T. Kyne’s office. Enter Kyne’s office and you’ll notice the bookshelf in the corner can be partially seen through. Use Kinesis to slide the bookshelf out the way and collect the fragment inside.
RIG Description/Backtracking:
Continue through the level, beyond repairing the the centrifuge and entering the third area (through the circular door in the main Engineering hub). Proceed down a series of elevators, though a spasming door at the bottom and onward to the Engine Room. At the back of the room behind the second engine that you must replace a power cell into is a fragment, collect it.
RIG Description/Backtracking:
After speaking to Hammond in the Captains Nest, leave and kill the Brute. You will enter an elevator and complete the tasks on floor 2 and then return to the elevator to head to floor 3. Once here, leave the elevator go through the first and only door, and then enter the first door on the right that you come to. This is named the Break Room; the fragment is between the door you entered from and the screen on the wall.
RIG Description/Backtracking:
Progress through the level and find the source of the broadcast, and continue until you are required to end the lockdown. This will take you through the Emergency Room, through Intensive Care Unit and into Dr C. Mercer’s office. You are required to enter Mercer’s office to continue the storyline but the fragment is on the desk.
RIG Description/Backtracking:
Towards the end of the chapter, you will be confronted with the Hunter (regenerative Necromorph) that you will need to place in Cryofreeze. Rather than picking up the Liquid Nitrogen and triggering the next sequence, head around the chamber in the middle of the room to the side which is closest to the right of the two single doors. Look above the chamber and collect the fragment with your Kinesis.
If you have triggered the Hunter sequence, freeze it and then re-enter the room to collect the fragment (all other Necromorphs will flee).
RIG Description/Backtracking:
This fragment is highly missable during the chapter.
Progress through the level dispatching the Wheezers in the West Grow Chamber. Once done, you will need to enter the East Grow Chamber from the second floor. There is a room between the two chambers that has a Wheezer and a Tentacle that must be destroyed to give you access to the East Grow Chamber. As soon as you enter the East Grow Chamber, immediately look far to the right and up, beyond the pillar in front of you is the fragment; use Kinesis to collect it.
You can collect the fragment whilst in Zero Gravity, but it may not be as easy to locate.
RIG Description/Backtracking:
This fragment is missable during the Chapter, simply because of the route the storyline wishes you to take.
Progress though Mining and complete Deck C. You will then return to the elevator and travel to Deck B: Processing. Clear the first room and enter the Mineral Processing Area. There will be a Store on the right at the end of the corridor and a room named Mineral Samples. You cannot enter this room because you need Clearance Level 3. Proceed into the next area, dispose of the 4 “anomalies” and dispatch the enemies. Then travel into Mineral Processing Control and collect Dallas’ RIG. This will give you Clearance Level 3. Although you can proceed and ultimately return to the area with the Store, be safe and backtrack the two rooms to Mineral Samples. The fragment is on the desk.
RIG Description/Backtracking:
Proceed through the level until you reach the Communications Control Room and then enter the Communications Array. This is where you need to realign the array to broadcast a signal. Dispatch the enemies and then look directly at the screen which shows where your antennas are positioned. Then look to the left and you’ll see a flesh covered wall. Use your gravity boots to travel up to the fragment.
RIG Description/Backtracking:
This fragment is missable during the Chapter, if you do not enter the area you unlocked.
Progress through the level, destroying the first Tendril in the Standard Quarters and then take the lift to the Central Nexus where you have an unfriendly chat with Dr C. Mercer. Flee the Hunter, pass through the Mess Hall and into the Deluxe Suites. This is where you need to destroy the second Tendril.
Upon entering, you will notice that many of the doors are without power. Enter the corridor and then into the Deluxe Quiet Bunks and pick up the power cell. Exit the room and place the cell in the source at the end of the corridor beyond the Deluxe Guest Suite. Then override its controls to allow access to all doors. Return down the corridor and pass through the first door you used to access the corridor you’re in. The doors on the opposite side of the rectangular room will now be open. Enter the left of the two doors and find the fragment on a desk to your left.
RIG Description/Backtracking:
Continuing on from Fragment 10, you will need to enter the Executive Suite and then return to the Central Nexus to access Chief Stewards Office. Enter and speak with Dr T. Kyne. When the conversation is over, he will leave allowing you access to the room he was in through a door to the left. Enter and the fragment is on a table directly ahead of you.
RIG Description/Backtracking:
At the start of the chapter you will need to travel back to Hanger/Cargo/Tram Control on the tram. The first order of business is to enter the Cargo Bay to raise the Marker. When you enter the Cargo Bay, there will be a Bench to your left and an elevator to your right. Take the elevator down. The fragment is located on the opposite and diagonal end of the room. As the room is large, but simply rectangular in nature, head to the left as far as you can go, and then turn 90 degrees right and run as far as you can go. The fragment is on a shelf.
RIG Description/Backtracking:
Now you have all 12 Marker Fragments, complete the Cargo Bay area. The story will return you to the tram station but wants you to continue to Flight Lounge; instead, jump back on the tram and travel to Crew Quarters. Move through into the main area that has the store and use the elevator directly opposite to return to the Central Nexus (floor 1). Now enter the room and use the other elevator in the middle of the room to go up one floor. Then skirt all the way around, past the store and save station, and enter the Executive Quarters. After the next two short corridors, enter the first door on your left named Captain B. Mathias.
On the table will be a Marker with 12 candles around it. There will also be a console at the table which will ask whether you would like to “Inspect?”. Yes please. If you have successfully found all the Marker Fragments, the 12 candles will have a Marker symbol for a flame. Now, just complete the game as normal and enjoy the alternative ending.
Open your RIG and select Show Key Items, and cross reference your Fragments with the RIG Description/Backtracking for each one listed above. Once you have identified which ones are missing, return to collect them. When you have all 12 Marker Fragments, return to the Captains Quarters and inspect the console again. Any candles that were missing a symbol should now have one and you are free to continue the game as mentioned above.
I hope this guide is of use to you; if it has been, please click like because this took over 20 hours to figure out, compile and write!
Good luck!
The achievement requires twelve Fragments and Assembly. I will not spoil the surprise, only explain how to do it.
Overview.
You cannot complete this achievement on your first playthrough, it can only be done in New Game Plus.
There are 12 Marker Fragments you need to find throughout the game, place them in the Captains Quarters to activate the ending and then complete the game.
All Marker Fragments have a purple glow, allowing you to more easily identify them from a distance.
They do not need to be collected sequentially and you can return at anytime to collect them, providing you haven’t left the USG Ishimura (point of no return).
If you collect a Marker Fragment and then die, and the game returns you to a checkpoint/save which is before the time you collected the Fragment, you will need to collect it again. This also applies to Marker Assembly.
It is worth creating a second precautionary save slot before you leave the USG Ishimura, so that you can return to a point where you can fix any potential errors without needing to start again.
Marker Fragments can be tracked by opening your RIG and selecting
Regarding the tracking, there is a flaw with the DS1 controller setup;
Please take reference of the room names used in this guide. They will help to track your own location and can be found above nearly any door you walk through.
Fragment 1. Chapter 1: New Arrivals.
During Chapter 1 you will need to repair the tram. This consists of 2 parts: retrieving the data board and replacing the tram. When you go for the data board you’ll enter the Maintenance Bay and then the Maintenance Office, where the data board is located. The first fragment is located on a shelf; melee the shelf and collect the fragment.
RIG Description/Backtracking:
Fragment 2. Chapter 2: Intensive Care.
During Chapter 2 you will need to find a Shock Pad in the Research Wing. Enter the area and the room will go into Lockdown. Clear the upper floor, take the elevator down and clear the lower floor. There are 3 accessible rooms: from the elevator, to the left is Dr N. Brennan’s office, your route to the right and directly ahead is Dr T. Kyne’s office. Enter Kyne’s office and you’ll notice the bookshelf in the corner can be partially seen through. Use Kinesis to slide the bookshelf out the way and collect the fragment inside.
RIG Description/Backtracking:
Fragment 3. Chapter 3: Course Correction.
Continue through the level, beyond repairing the the centrifuge and entering the third area (through the circular door in the main Engineering hub). Proceed down a series of elevators, though a spasming door at the bottom and onward to the Engine Room. At the back of the room behind the second engine that you must replace a power cell into is a fragment, collect it.
RIG Description/Backtracking:
Fragment 4. Chapter 4: Obliteration Imminent.
After speaking to Hammond in the Captains Nest, leave and kill the Brute. You will enter an elevator and complete the tasks on floor 2 and then return to the elevator to head to floor 3. Once here, leave the elevator go through the first and only door, and then enter the first door on the right that you come to. This is named the Break Room; the fragment is between the door you entered from and the screen on the wall.
RIG Description/Backtracking:
Fragment 5. Chapter 5: Lethal Devotion.
Progress through the level and find the source of the broadcast, and continue until you are required to end the lockdown. This will take you through the Emergency Room, through Intensive Care Unit and into Dr C. Mercer’s office. You are required to enter Mercer’s office to continue the storyline but the fragment is on the desk.
RIG Description/Backtracking:
Fragment 6. Chapter 5: Lethal Devotion.
Towards the end of the chapter, you will be confronted with the Hunter (regenerative Necromorph) that you will need to place in Cryofreeze. Rather than picking up the Liquid Nitrogen and triggering the next sequence, head around the chamber in the middle of the room to the side which is closest to the right of the two single doors. Look above the chamber and collect the fragment with your Kinesis.
If you have triggered the Hunter sequence, freeze it and then re-enter the room to collect the fragment (all other Necromorphs will flee).
RIG Description/Backtracking:
Fragment 7. Chapter 6: Environmental Hazards.
This fragment is highly missable during the chapter.
Progress through the level dispatching the Wheezers in the West Grow Chamber. Once done, you will need to enter the East Grow Chamber from the second floor. There is a room between the two chambers that has a Wheezer and a Tentacle that must be destroyed to give you access to the East Grow Chamber. As soon as you enter the East Grow Chamber, immediately look far to the right and up, beyond the pillar in front of you is the fragment; use Kinesis to collect it.
You can collect the fragment whilst in Zero Gravity, but it may not be as easy to locate.
RIG Description/Backtracking:
Fragment 8. Chapter 7: Into the Void.
This fragment is missable during the Chapter, simply because of the route the storyline wishes you to take.
Progress though Mining and complete Deck C. You will then return to the elevator and travel to Deck B: Processing. Clear the first room and enter the Mineral Processing Area. There will be a Store on the right at the end of the corridor and a room named Mineral Samples. You cannot enter this room because you need Clearance Level 3. Proceed into the next area, dispose of the 4 “anomalies” and dispatch the enemies. Then travel into Mineral Processing Control and collect Dallas’ RIG. This will give you Clearance Level 3. Although you can proceed and ultimately return to the area with the Store, be safe and backtrack the two rooms to Mineral Samples. The fragment is on the desk.
RIG Description/Backtracking:
Fragment 9. Chapter 8: Search and Rescue.
Proceed through the level until you reach the Communications Control Room and then enter the Communications Array. This is where you need to realign the array to broadcast a signal. Dispatch the enemies and then look directly at the screen which shows where your antennas are positioned. Then look to the left and you’ll see a flesh covered wall. Use your gravity boots to travel up to the fragment.
RIG Description/Backtracking:
Fragment 10. Chapter 10: End of Days.
This fragment is missable during the Chapter, if you do not enter the area you unlocked.
Progress through the level, destroying the first Tendril in the Standard Quarters and then take the lift to the Central Nexus where you have an unfriendly chat with Dr C. Mercer. Flee the Hunter, pass through the Mess Hall and into the Deluxe Suites. This is where you need to destroy the second Tendril.
Upon entering, you will notice that many of the doors are without power. Enter the corridor and then into the Deluxe Quiet Bunks and pick up the power cell. Exit the room and place the cell in the source at the end of the corridor beyond the Deluxe Guest Suite. Then override its controls to allow access to all doors. Return down the corridor and pass through the first door you used to access the corridor you’re in. The doors on the opposite side of the rectangular room will now be open. Enter the left of the two doors and find the fragment on a desk to your left.
RIG Description/Backtracking:
Fragment 11. Chapter 10: End of Days.
Continuing on from Fragment 10, you will need to enter the Executive Suite and then return to the Central Nexus to access Chief Stewards Office. Enter and speak with Dr T. Kyne. When the conversation is over, he will leave allowing you access to the room he was in through a door to the left. Enter and the fragment is on a table directly ahead of you.
RIG Description/Backtracking:
Fragment 12. Chapter 11: Alternate Solutions.
At the start of the chapter you will need to travel back to Hanger/Cargo/Tram Control on the tram. The first order of business is to enter the Cargo Bay to raise the Marker. When you enter the Cargo Bay, there will be a Bench to your left and an elevator to your right. Take the elevator down. The fragment is located on the opposite and diagonal end of the room. As the room is large, but simply rectangular in nature, head to the left as far as you can go, and then turn 90 degrees right and run as far as you can go. The fragment is on a shelf.
RIG Description/Backtracking:
Marker Assembly.
Now you have all 12 Marker Fragments, complete the Cargo Bay area. The story will return you to the tram station but wants you to continue to Flight Lounge; instead, jump back on the tram and travel to Crew Quarters. Move through into the main area that has the store and use the elevator directly opposite to return to the Central Nexus (floor 1). Now enter the room and use the other elevator in the middle of the room to go up one floor. Then skirt all the way around, past the store and save station, and enter the Executive Quarters. After the next two short corridors, enter the first door on your left named Captain B. Mathias.
On the table will be a Marker with 12 candles around it. There will also be a console at the table which will ask whether you would like to “Inspect?”. Yes please. If you have successfully found all the Marker Fragments, the 12 candles will have a Marker symbol for a flame. Now, just complete the game as normal and enjoy the alternative ending.
IF you have inspected the console and one or more of the 12 candles does not have a Marker symbol, the alternative ending will not be triggered. Not to worry, this can be rectified providing you do not leave the USG Ishimura (point of no return).
Open your RIG and select Show Key Items, and cross reference your Fragments with the RIG Description/Backtracking for each one listed above. Once you have identified which ones are missing, return to collect them. When you have all 12 Marker Fragments, return to the Captains Quarters and inspect the console again. Any candles that were missing a symbol should now have one and you are free to continue the game as mentioned above.
I hope this guide is of use to you; if it has been, please click like because this took over 20 hours to figure out, compile and write!
Good luck!
 Korvanick
 TrueAchievements
TrueAchievements
This can be achieved on a New Game+ playthrough.
In the first mission, you will have a mission objective to find a Data Board. Progress through the mission by unlocking the Maintenance Bay (first breaker in the game) and on the upper floor disabling the lights to unlock doors (second breaker). Go back down the elevator to find the room with the Data Board now open.
Immediately after picking up the Data Board, the first Maker fragment can be found glowing purple on the shelf to the right. Shoot the paper in front of it and it can be retrieved.
There are a total of 12 Marker fragments found throughout the game, but this is the first one you come across.
2 Comments
Is there any point in getting the remaining 11?
By Ask Twispike on 29 Jan 2023 09:31
Yes, you need all 12 for the alternative ending achievement.
By Ayo Peso on 29 Jan 2023 13:27
 MattLorrigan
 Marker Fragments are a brand new collectible in the Dead Space remake, exclusively found in a New Game+ playthrough. You’ll need to collect all thirteen of them to see the new alternative ending and unlock the Reunion (40G) achievement, but you’ll only need one Marker Fragment for this particular achievement. You can check out our full Dead Space Marker Fragment guide here.
luiz_felipe64  PSNProfiles
PSNProfiles
We cannot show the content due to copyright protection. Please click the link below to view the guide.