

Grand Theft Auto V
78 Achievements

Elitist
Complete all 3 Elite Challenges in The Doomsday Heist.
How to unlock the Elitist achievement in Grand Theft Auto V - Definitive Guide
 DarthKrid, PowerPyx, Jerry, Appleby
 I highly advise practising each Finale once you are able to start them to familiarise yourself with them as you will need to complete each Finale quickly and without dying. An Act's Finale is made available once you have completed all of that Act's Prep and Setup Missions.
Once you have unlocked a Finale, play through it but purposefully fail by having a player leave GTA Online through the Pause Menu or by dying/committing suicide. After this, you are taken to a screen where you can choose to Quick Restart or Continue - choose to Continue by pressing
 . Then restart the Finale so that you can restart it from the beginning and continue practising.
Once your team is comfortable with the Finale, attempt a timed run using a stopwatch/smartphone: start the timer when you gain control of your character and stop the timer once you lose control at the end. If you feel you will not complete the Finale in the required time for the Elite Challenge, or have failed to meet any other requirements for that Act's Elite Challenge, ensure you purposefully fail to avoid completing the Finale, since if you do complete it, you will have to redo all Prep & Setup Missions for that Act to regain access to the Finale.
A good way to save time on each Finale is to own one of the following Facilities:
- Ron's Alternative Wind Farm Facility ($1,875,000)
- Grand Senora Desert Facility ($2,525,000)
- Sandy Shores Facility ($2,740,000)
For Act II, the best-located Facility is the Paleto Bay Facility ($1,250,000), but it is not worth purchasing the Paleto Bay Facility solely for Act II since you can complete the Act II Finale in good time for its Elite Challenge from the suggested Facilities above.
The Grand Senora Desert and Sandy Shores Facilities are better-placed than the Ron’s Alternative Wind Farm Facility but more expensive.
The Sandy Shores Facility is overall the most well-placed Facility for all 3 Finales, though you may find the Grand Senora Desert Facility conveniently located close to the Sandy Shores airfield if you like using air vehicles.
I used the Ron's Alternative Wind Farm Facility as it was cheaper and found that it worked fine for the Elite Challenges.
The requirements for the Elite Challenges are as follows:
Act I:
- Complete within 5:30
- Kill 78 enemies or more
- Nobody dies
- Do not trip-skip
You will more than likely kill 78 enemies naturally, but to maximise your chances of doing so, place particular focus on taking out as many enemies as you can once you gain control of the Base Defence System in the last checkpoint.
Read the Tips & Strategies section for advice on not dying, and see the video below for a demonstration.
Act II:
- Complete within 15:00
- Take 5% damage to the Avenger or less
- Nobody dies
- Do not trip-skip
The most difficult requirement here is the damage requirement; you can only take a few hits to the Avenger and it is difficult to tell from the Avenger's damage bar exactly how much damage has been taken. Try to have 2 or 3 players in the Air Support team so they can effectively defend the Avenger using its turrets. The submarine section can be comfortably completed alone by a team member familiar with the role. You may also find yourself taking less damage to the Avenger if you fly the Avenger to a point of high altitude, this will result in enemy helicopters having to spend time raising their altitude before they can attack you, giving you more time to take them out.
Read the Tips & Strategies section for advice on not dying, and the videos below for a demonstration.
Submarine Role:
Air-Support Role:
Act III
- Complete within 30:00
- Get 150 headshots
- 0 hacks failed
- Nobody dies
- Do not trip-skip
There will be ample opportunities to execute headshots in the server section where you are tasked with performing 4 hacks. Take cover and make the most of the infinitely-respawning AI to spawn-kill them.
The designated hacker should get used to playing the minigame quickly and without failing - being able to complete the hacking sections quickly is a huge time-saver in this Finale and will significantly shorten the server section of the Finale. There are 4 hacks, and as long as you don't lose all of the lives you are given in each hacking minigame you will pass the requirement for not failing. The hacker can see the number of lives remaining for each hacking minigame in the top right of the minigame screen. If you or a team member feels they may fail a hack by losing all of their lives in the hacking minigame, they can quit the minigame by pressing
 and restart the hack immediately after, this does not count as a fail and will still allow you to meet the requirements for the challenge.
The most difficult requirement here is nobody dying. There is a lot of combat in this Finale and your team should get used to taking out Juggernauts together before they kill you. Familiarise yourself with the techniques given in the Tips & Strategies section, and see the video below for a demonstration.
You will be awarded $50,000 for each Elite Challenge you complete. The trophy will pop once you have completed all 3 challenges (they needn’t be completed with the same group of players, and can be completed in any order you prefer; you just need to complete each Elite Challenge once).
BiggD, Barad In order to obtain this achievement, you will need to complete all of the Elite Challenges for each Heist Finale in The Doomsday Heist. Before covering basic guidelines and tips, please refer below to each Finale's Elite Challenge and take note that they can be done on Normal.
Act I
- Complete under 5:30 minutes
- Kill 78 enemies
- Nobody gets wasted
Act II
- Complete under 15:00 minutes
- Vehicle damage 5% or less
- Nobody gets wasted
Act III
- Complete under 30:00 minutes
- Nobody gets wasted
- 0 hacks failed
- 150 headshots
As you can see, the most difficult part of each Elite Challenge is completing the Finale under a certain time constraint. As such, it's worth discussing which of the Facilities is best situated for each Finale.
- For the Act I Finale, the Grand Senora Desert Facility ($2,525,000) is the closest.
- For the Act II Finale, the Paleto Bay Facility ($1,250,000) is the closest.
- For the Act III Finale, the Sandy Shores Facility ($2,740,000) is the closest.
All of that being said, you can only own one Facility at a time. So, if you coordinate with your teammates, you can each buy the Facilities mentioned above; however, if the same player will be hosting all three heists, the Sandy Shores Facility is probably the best option (despite its grand cost).
Now that you know which Facilities are best, please continue reading below for some basic tips and notes for each Finale.
General Guidelines
- Don't bother attempting this on your first go at the Finale
- Tackle these Elite Challenges on your second or third playthrough as to increase your familiarity with objective routes and enemy spawns
- All players present should be using microphones to communicate
- These Elite Challenges are best done with a full group of four players
- Stock up on snacks and Super Heavy Body Armor before every Finale
- When traveling to the Finale's location from your Facility, everyone should be in one vehicle (ideally, an Armored Kuruma)
- It's smart to use a stopwatch during these Finales; as soon as you gain control of your character after leaving the Facility, start the stopwatch
Because playstyle and strategies will vary from player to player, there are no set-in-stone guidelines on how to tackle each individual portion of a Finale's Elite Challenge. Overall, the Challenges themselves are pretty self-explanatory: complete the Finale quickly, ensure nobody dies, and either kill a set amount of enemies, keep your vehicle in pristine condition, complete hacks perfectly, and score a set amount of headshots.
Remember, do not try these Elite Challenges on your first playthrough of the Heist Finales. It's much easier and far more intelligent to attempt them once you are very familiar with the objectives at hand, the routes you need to take to these objectives, and where and how the enemy will act in regards to your presence in the mission.
Once all three sets of Elite Challenges have been completed, this achievement will finally unlock.
A step-by-step guide/walkthrough of this entire DLC, courtesy of user Neg96, can be found HERE. It is extremely detailed, and should provide all of the information needed to finish this heist.
Qannt  stratege.ru
stratege.ru
"Data leak"
1.Complete in less than 5:20 minutes. (You need a base in the Grand Senora desert for $2.525000 from the host)
2. Perform at least 75 kills
3.No quick restarts (i.e. deaths)
Operation "Bogdan"
1.Walk in less than 15 minutes.
2.Avenger should not receive more than 5% damage
3.No quick restarts (i.e. deaths)
"Doomsday" scenario
1.Walk in less than 30 minutes.
2.Make at least 150 hits to the head
3.No errors when hacking (hacking 4 servers)
4.No quick restarts (i.e. deaths)
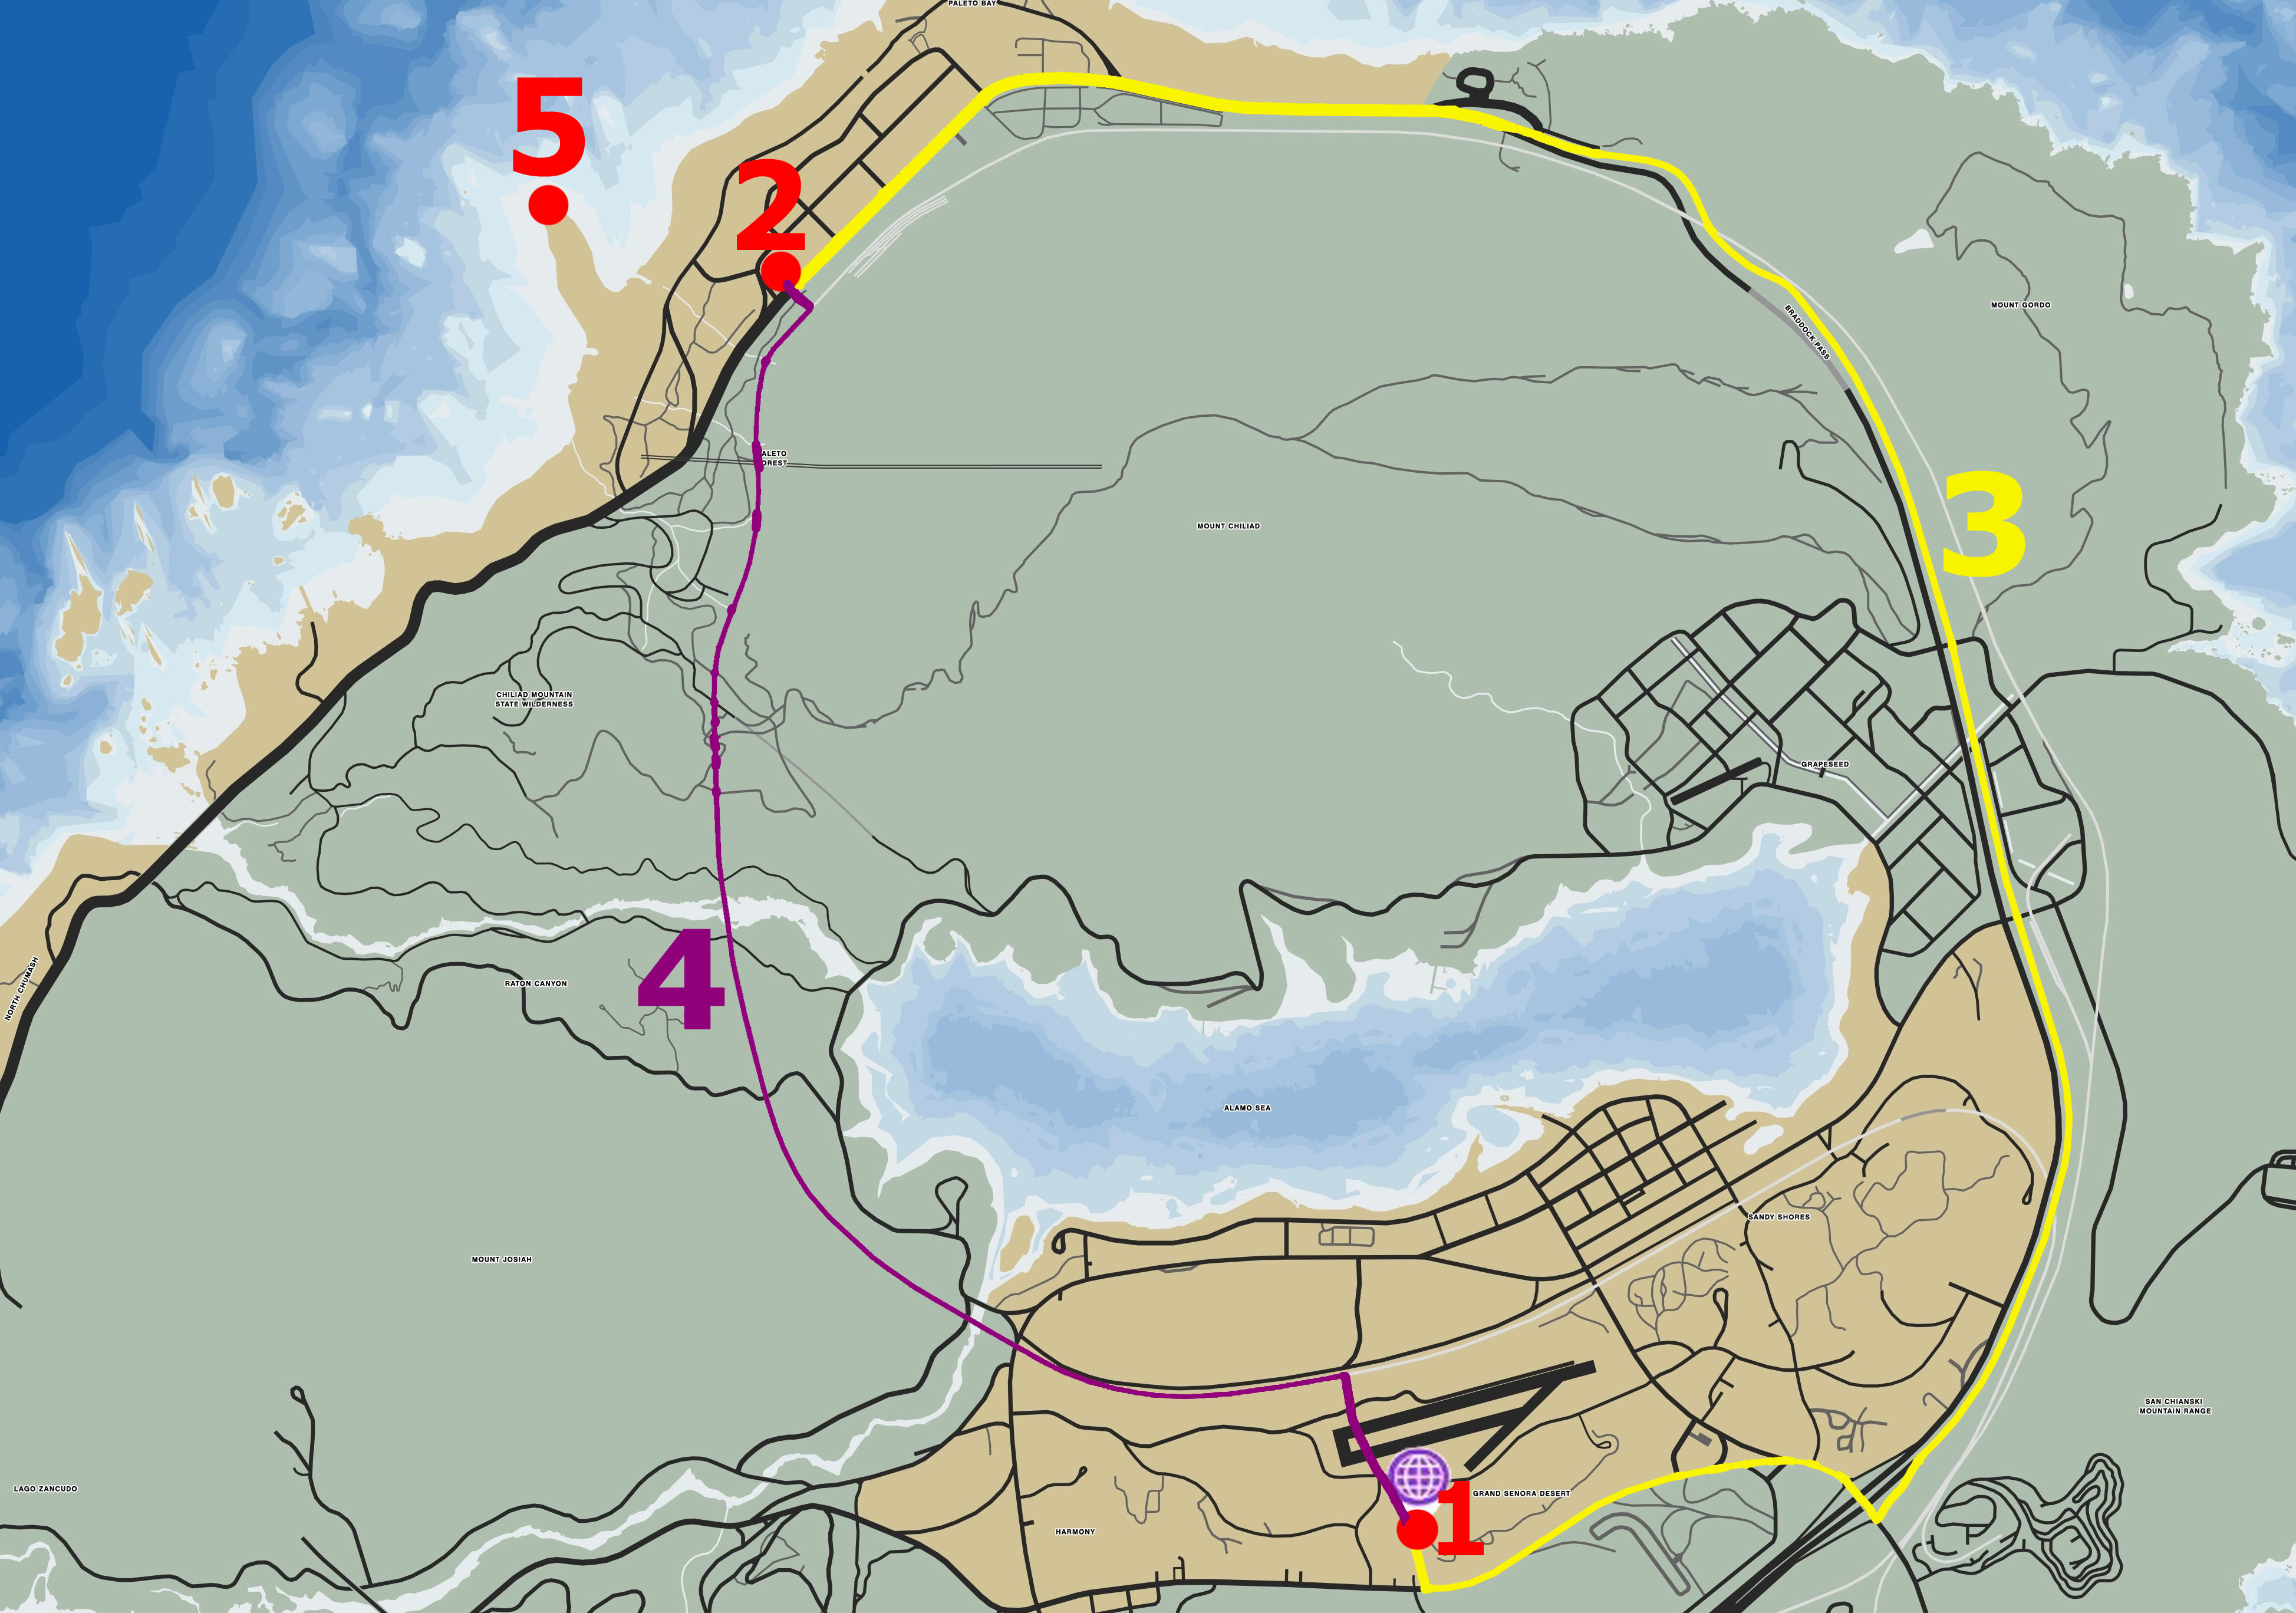
1. Heist "Data leak" - our base is closest. Everything here is as in ranas1992's hint.
2. The Bogdan robbery must be completed in 15 minutes. Adviсe:
1) The submariner team needs to get from the base to Stromberg (from point 1 to point 2) no later than 4:00 from the start of the robbery. We drove along the highway (route 3) in a sports car in 3:00. By rail (route 4) it took 2:10 on motorcycles (there are bottlenecks). The support team may arrive later.
2) In a submarine, the two of you run to the bridge, then one player goes down to interrogate, the second remains on the bridge with a camera at the ready. As soon as the interrogation is over, take a photo and the cutscene will immediately begin, the first player does not need to return.
3) Support flies to point 5. If there are jet skis on the spit: land the Avenger, get on the motorcycles and swim into the sea a little further than the submarine. The helicopters will not attack either the Avenger or you. When the submariners are finished, pick them up and drive them to the Avenger. Helicopters may start shooting, keep food ready. If there are no motorcycles, the divers will swim on their own, it takes a minute longer, but you still have time if they start surfacing no later than 9:50.
4) You need to take off with submariners on board no later than 11:50
3. Robbery scenario "Doomsday". Tips for keeping it to 30 minutes:
1) Take the Barrage, not the tank.
2) At a stage with two corridors, it is better not to separate. Move in a crowd, it's faster and safer. Route: first, in the left corridor, run to the first box and explode it. One player can run there, and there will be 1-2 soldiers along the way. Then return to the fork and move along the right corridor with the whole crowd. In the second large room there is a connection to the left corridor, go there together and continue along the left corridor to the end.
3) During the hacking phase, while player1 is hacking the first console, player2 is making his way to the second console. Once player1 finishes hacking, player2 immediately starts hacking the second console. At this time, player 1 makes his way to the third console and so on. Players 3 and 4 are busy landing headshots and helping Players 1 and 2 get between the hacking points.
4) One player can immediately after the hacking is completed make his way upstairs and stand at the control panel. Once the orbital cannon is available, he takes target C as it is the furthest away. The remaining players, who get to the consoles a little later, take the remaining nearby targets.
AKELLA stratege.ru
stratege.ru
First robbery
https://youtu.be/ifxx1Cz_U0U
Second robbery:
Support team
https://youtu.be/04MwlBLnvrE
Submariner team
https://youtu.be/ezxts7Pj0-A
Third robbery
https://youtu.be/MB_Lp1jliwA
Jiwan01  PSNProfiles
PSNProfiles