Inscryption
40 Achievements
1,000
40-50h
PC
Xbox One
Xbox Series
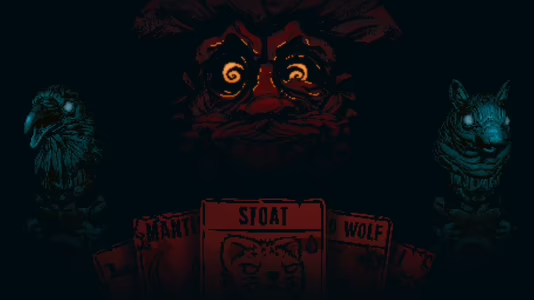
Rank and File
Defeat The Archivist. Details for this achievement will be revealed once unlocked
30
15.2%
How to unlock the Rank and File achievement in Inscryption - Definitive Guide
 pennysticks
 Much like Act II, you will be sequistered to the right side of the map until you defeat one of the two bosses (The Archivist and The Photographer). The Archivist is located in the same general area the Grimora battle was in Act II (bottom right). You will need to complete a few regular card battles to make your way to the boss gate and will not be able to access the boss room until you obtain the quill from a room to the right of the gate. It is important to know there is a missable trophy that you should prepare for by looking at Agonizing Remorse  , otherwise you will need to repeat this boss fight in chapter select post-game.
The Archivist will have an attack ready to go as soon as you put down your first Empty Vessel, sending three identical cards down the line at you - Librarians, with 1 Power, 2 Health, Mighty Leap and Dead Byte
  Sigils.
That last item, the Dead Byte Sigil, is the gimmick of the battle. When you attack the Librarians, you will be asked for permission to access the hard drive. For the PlayStation version, you will not be actually granting access to the hard drive (the PC version did access your actual files) so you will be utilizing Luke's files on a C: and D: drive. The idea is that you choose how much damage you will inflict by the weight and size of the file you select.
I would suggest you head to the D: drive > LuckyCarder > Recordings. There are a few files in here ranging from 1 GB to 800 MB, as well as an additional file in the DontLookInHere folder that is 2 GB. If you can keep the scale balanced enough without taking too much damage during the battle, two to three large files should be enough to end the round in your favor.
In Round Two, you will be asked to pick a file at the start that is precious and old. Luke happens to have some old photos of his sister that work well for this, but you can pick any file you want if you are going to go for the Agonizing Remorse trophy. Head to C: drive > Users > Luke > Documents > Photos > luke&el.jpeg. This will create a card depicting a file holding a gun to its head with a Power of 4 and a Health of 4. You can play this card (it will have a energy cost of 2) and immediately destroy it with the hammer for the missable trophy, or keep it as an offensive strike to assist in ending the round quickly.
Whichever cards you use for the second round, it should end without too many more surprises and you will have this trophy,
An example of my experience with the boss battle can be seen at the end of Agonizing Remorse
The Archivist will have an attack ready to go as soon as you put down your first Empty Vessel, sending three identical cards down the line at you - Librarians, with 1 Power, 2 Health, Mighty Leap
and Dead Byte Sigils.That last item, the Dead Byte Sigil, is the gimmick of the battle. When you attack the Librarians, you will be asked for permission to access the hard drive. For the PlayStation version, you will not be actually granting access to the hard drive (the PC version did access your actual files) so you will be utilizing Luke's files on a C: and D: drive. The idea is that you choose how much damage you will inflict by the weight and size of the file you select.
I would suggest you head to the D: drive > LuckyCarder > Recordings. There are a few files in here ranging from 1 GB to 800 MB, as well as an additional file in the DontLookInHere folder that is 2 GB. If you can keep the scale balanced enough without taking too much damage during the battle, two to three large files should be enough to end the round in your favor.
In Round Two, you will be asked to pick a file at the start that is precious and old. Luke happens to have some old photos of his sister that work well for this, but you can pick any file you want if you are going to go for the Agonizing Remorse
Whichever cards you use for the second round, it should end without too many more surprises and you will have this trophy,
An example of my experience with the boss battle can be seen at the end of Agonizing Remorse
legendaryjman Story related, can not be missed.
This takes place in Act 3. While you are not able to see the full map initially the map is the same as the Act 2 map. The Archivist is one of the uberbots. It is located in the bottom right corner, which is the same place where Grimora and the Temple of the Dead was located.
This fight is the one part of the game where it was better to play on the PC version. The Archivist will have you pick files on your computer to combat it. If a picture was shown it would display it, if an audio file was picked it would play it. In the xbox version you have a fake computer that you dig through. Mechanics are the same, but its not as fun as picking your own files.
Phase 1:
The Archivist sends out Libarians (1/2 mighty leap, death byte sigils). Once a Librarian is killed you will be asked to pick a file from the fake computer. The larger the file the more damage you will do. You will need to defeat Librarians and pick files until you have tipped the scale all the way.
Phase 2:
At the beginning of the phase the Archivist will ask you to pick a file that will become a card. You pick the file from the fake computer. The older the file the stronger the card is. Be careful because if the card is killed the file gets deleted. They are all fake files so nothing can hurt your xbox, BUT if you pick something like sys32.exe and it gets deleted the game crashes. You don't lose anything. You just have to restart the game and do the Archivist boss fight again.
Rqsb_  PSNProfiles
PSNProfiles
We cannot show the content due to copyright protection. Please click the link below to view the guide.