

Nobody Saves the World
41 Achievements
20-25h
GOG

Super Wiz
Reach max Rank on all Forms
4.6%
How to unlock the Super Wiz achievement in Nobody Saves the World - Definitive Guide
 Mr SpinelesS
 TrueAchievements
TrueAchievements
To get Nobody (your base character) to S Rank you have to get to the point in the story where you gain the achievement "Fortress in the Sky" as for the other forms:
Unlocking all Form Quests
At the start of the game your limited to the amount of form quests you can do.
You unlock form quests as you progress the story. The two most notable points are:
1) When you run into the Hammer while going for the Crystal in Either the Witch Queen Catacombs or Ancient Robot (doesn't matter which one)
2) When you Give 3 Crystals to Octavia. Once this is done your able to reach S rank with all forms except Nobody.
Easy Location to Do Quests
All the form quests are pretty easy and can be done while exploring, but if you would prefer a location that's easy to knock them out:
I did most of mine in the graveyard North of the Eldritch Gourd. until I got too high a level (+10 levels above enemies) and they would no longer spawn because they were afraid of me. (EDIT: this is the SE corner of the map, near the Witch Queen Catacombs that you go to early in the game)
You can run over the graves to spawn a bunch, they are easy to dodge, easy to group up and kill, and it's very close to the edge of the zone so you can leave and re-enter to respawn all enemies. And the Gourd has Sharpness mobs, which will allow you to do most of the ward quests.
Difficult Form Quests:
Not many (if any) of the form quests are very difficult but will put tips here if needed:
Gallop for 10 seconds without damage or stopping: I may have gone a little overboard to get this one. I went to the area Around Grand Castle (1st crystal) Cleared all the monsters etc. I removed the Fleet Footed passive from the horse and added the magic life passive (after mana is depleted health is spent as mana - this appears in the store late in the game) and galloped from the South East corner all the way around the map to the west. I screwed up on my run and ran into a wall or two, and used up all my mana and started using my health, but the quest completed.
EDIT: According to Monchow you can just run against a wall, guess I didn't have enough mana at the time I first tried this...
Reduce, Reuse, Recycle
This was slightly confusing, as I was trying to re-summon dead demons, and that doesn't work. Needs to be an animal (or possibly a zombie) corpse on the ground for summon to work, and demons don't leave corpses when they die.
The easiest way to get this one is to use 3 seperate skills (though only 2 are needed)
1) Hat Trick (Summon Companion)
2) Sacrifice (Kill Companion - or you can just let it die)
3) Summon Demons (reuse corpse of companion for demon)
Make sure to create the summon circle over your companions corpse, and not over an enemies.
Healing Companions While the monk has the bless me skill that heals you and familiars, it costs 50 mana and is slow to use for the quests. Your best bet is to unlock the necromancer and use his base passive Blood Pact This heals your companions based on the damage you do (100% - 250%), so just having a bunch of companions and hitting enemies will quickly complete these tasks.
Have X companion
The best way to get this is to bunch up a large group of enemies (the graveyard mentioned above works well for this) and use Zombite on the group to infect them so they turn into zombies when they die. Then proceed to cast Hat Trick (summon animal) as much as you can with your mana. hit enemies to regain mana, and repeat the summons until all enemies are dead. You should have enough companions at this point. Having the Necromancers passive Blood Pact active will also allow you to heal your companions when your attack enemies, keeping them alive longer.
30 Comments
For Gallop I just ran against a wall, no need to change direction or avoiding anything
By Monchow on 26 Jan 2022 14:26
For the one for healing familiars on several forms wait till you have the necromancer's passive, forget it's name but it's much easier than trying to use the egg's healing ability that I was using earlier in the game.
By Calex dEUS on 28 Jan 2022 22:27
 LxVaiN
TrueAchievements
TrueAchievements
From the Groundskeeper`s Ground Teleporter you can go to the right to enter a very dark cave called The Expanse. This cave is not missable since you need to pass through it to get to one of the last legendary dungeons.
Except the quests for destroying a ward you can do pretty much every quest in there with ease. It takes about an hour to get every from to S rank. If you run out of mana or have very long cooldowns to wait for just step into the shadow and die. You will respawn right outside the cave at the checkpoint.
Edit:
The cave is to the right of the teleporter. This area is on the top left of the map.
(Not my screenshot. It belongs to a fairy location guide).
11 Comments
Could you add an image/video? I couldn't find the location.
By D0N Calvone on 24 Jan 2022 02:19
My favorite place to farm is Dark Nest (Dark Dungeon, top left of the map, below the red waterfall)
By redphx on 24 Jan 2022 03:03
 Necrophage33
As the description says, this achievement requires you to reach an S rank with every Form in the game. Forms are unlocked by ranking up with previous Forms, so you will naturally unlock every Form in the game by ranking them all up to S rank.
Be aware that you won't be able to reach S rank until you finish the first three Legendary Dungeons and then unlock Nostramagus is Missing! (15G). Right after you unlock that achievement, you also unlock more challenges for each Form, which are the last ones needed to be able to reach S rank. There are two unique Forms to this process: your base Form, and the Egg. Your base Form levels up by completing story quests (the Legendary Dungeons and Gem Shards, etc.). So you will automtically reach S rank with your base Form by the time you finish unlocking Fortress in the Sky (30G). I discuss the Egg requirements at the end of this solution.
Aside from those two Forms, every other Form is leveled up by completing combat challenges. While each Form has its own unique challenges, they pretty much all fall into set categries. The vast majority of them are very basic, such as hit X enemies with Y attack, and don't really require any guide, but here are some others and some tips.

This area contains 12 enemies (one of which is an elite enemy) and is great for every challenge aside from the ones requiring wards. Only two things to note about this spot. The first is that many enemies are slug enemies, and they are immune to Slow, so if you have any challenges that require you to Slow enemies or kill Slowed enemies, it won't work on them. There are, however, three fire breathers here that can be Slowed, so it still works here. Conversely, the three fire breathers are immune to Burn, which you need to do for the Dragon challenges, but the slugs can all be Burned. Once you've completed the challenge or run out of mana or enemies, you can either let the enemies kill you (preferable if the elite fire breather is alive, since you'll respawn with full health and mana), or fast travel away and back (you won't refill your health and mana this way).
Lastly, for the normal Forms, there is one other challenge I want to point out that gave me problems, and that's the Necromancer's challenge to create 5 Demon Familiars from Familiar corpses. The game doesn't tell you this, but you need to be aware that you cannot make Demon Familiars from Demon Familiar corpses! Instead, you need to use the Magician's ability to spawn rabbits and tigers, let them die, then use the Necromancer's ability to create Demon Familiars from them.
Finally are the Egg challenges. To get the Egg to S rank, you need to find the five nests and go on them as the Egg. Here are screenshots of where each nest is located. Normally the nest will be marked quite largely on your map when you get close but I had already used them, so I placed my cursor on where the nest is located.
Be aware that you won't be able to reach S rank until you finish the first three Legendary Dungeons and then unlock Nostramagus is Missing! (15G). Right after you unlock that achievement, you also unlock more challenges for each Form, which are the last ones needed to be able to reach S rank. There are two unique Forms to this process: your base Form, and the Egg. Your base Form levels up by completing story quests (the Legendary Dungeons and Gem Shards, etc.). So you will automtically reach S rank with your base Form by the time you finish unlocking Fortress in the Sky (30G). I discuss the Egg requirements at the end of this solution.
Aside from those two Forms, every other Form is leveled up by completing combat challenges. While each Form has its own unique challenges, they pretty much all fall into set categries. The vast majority of them are very basic, such as hit X enemies with Y attack, and don't really require any guide, but here are some others and some tips.
- Almost every Form has a challenge for breaking specific types of wards. No enemies in the overworld have wards, so you'll need to pull up the map and scroll over dungeons to see which wards they contain, and head to an applicable one for the challenge. I always saved these challenges for last and went to a dungeon and knocked out as many Form challenges as possible with those wards.
- Defeating enemies with three stacks of Attack Up or Defense Up. Always use 4-5 stacks of these before going for kills. This gives you far more time to attack enemies and kill them. If you only do the minimum 3 stacks, you'll find you only get one or two kills per usage. Instead, use all of your mana to give yourself tons of stacks and then just go crazy killing enemies.
- One specific type of challenge I want to highlight are ones that seemingly require a lot of mana. For example, the Magician has a challenge to have 20 Familiars at once, or the Robot has one for killing 12 enemies with a single Tempest Barrage, or the Horse has one for Galloping for 10 seconds without stopping or taking damage. There are a handful of challenges like these where you'll feel like you always run out of mana before you can complete the challenge. The easiest way around this is to buy (and preferably fully upgrade) the Magic Life passive from the Shop. This passive makes it so that when you run out of mana, your special attacks drain health. This essentially gives you a full mana bar and a full health bar to use for these challenges, making them far easier to complete. I used this passive for many challenges, not just these, so I never had to worry about running out of mana.
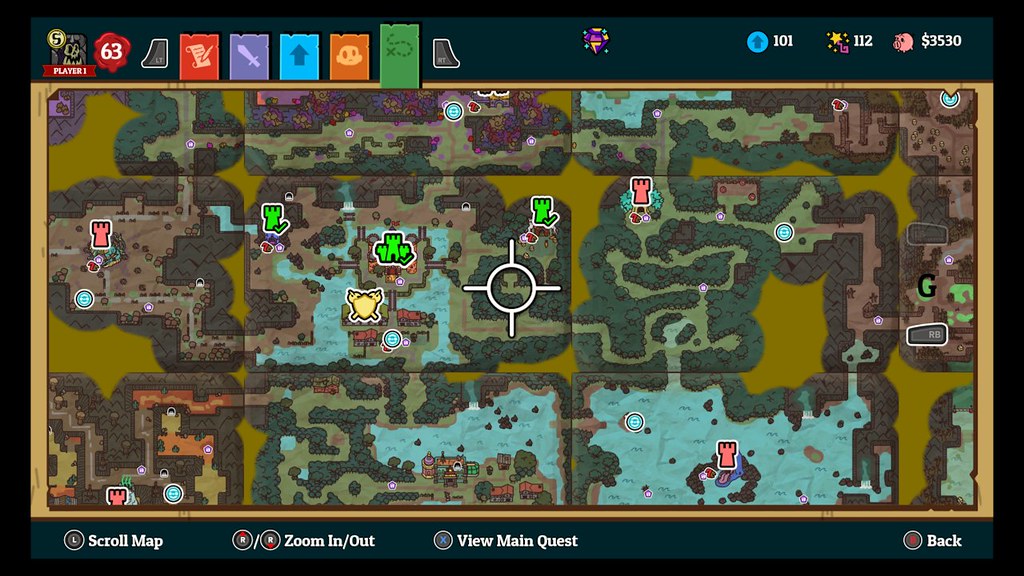
- The other type of challenge that can be difficult is doing something to a set amount of enemies at once. For example, the Horse has one for Galloping into 8 enemies in a single Gallop, or the Robot for killing 12 enemies with one Tempest Barrage, and other challenges where it feels difficult to reliably get that many enemies in one area for these challenges. I found a great place to farm these (and actually almost every) challenge, and it also works post-game because enemies in this area always scale to your level (and don't run away in Fear because they're too low of a level). The spot is in the northeast region of the map, and it is conveniently right at a fast travel spot. See screenshot below.
This area contains 12 enemies (one of which is an elite enemy) and is great for every challenge aside from the ones requiring wards. Only two things to note about this spot. The first is that many enemies are slug enemies, and they are immune to Slow, so if you have any challenges that require you to Slow enemies or kill Slowed enemies, it won't work on them. There are, however, three fire breathers here that can be Slowed, so it still works here. Conversely, the three fire breathers are immune to Burn, which you need to do for the Dragon challenges, but the slugs can all be Burned. Once you've completed the challenge or run out of mana or enemies, you can either let the enemies kill you (preferable if the elite fire breather is alive, since you'll respawn with full health and mana), or fast travel away and back (you won't refill your health and mana this way).
Lastly, for the normal Forms, there is one other challenge I want to point out that gave me problems, and that's the Necromancer's challenge to create 5 Demon Familiars from Familiar corpses. The game doesn't tell you this, but you need to be aware that you cannot make Demon Familiars from Demon Familiar corpses! Instead, you need to use the Magician's ability to spawn rabbits and tigers, let them die, then use the Necromancer's ability to create Demon Familiars from them.
Finally are the Egg challenges. To get the Egg to S rank, you need to find the five nests and go on them as the Egg. Here are screenshots of where each nest is located. Normally the nest will be marked quite largely on your map when you get close but I had already used them, so I placed my cursor on where the nest is located.
- Just east of the Knights Guild and Grand Castle
- Just southwest of the League of Wizards

- Just west of the Ancient Robot Legendary Dungeon

- Right behind the Beheaded Behemoth dungeon

- Just east of the Secret Corporation Legendary Dungeon

nesh_nedvin
 stratege.ru
stratege.ru
This guide was translated automatically.
When leveling up the Dragon to S, you come across a quest to kill enemies with a Status Explosion. Most likely, this is some kind of confusion with the translation, but it was not obvious to me what needed to be done. It turned out that to complete the quest you need to use the passive ability “Effective Explosion” .
4ernovik
stratege.ru
stratege.ru
This guide was translated automatically.
I recommend doing everything in an endless dungeon
pjcooper2012
 PSNProfiles
PSNProfiles
We cannot show the content due to copyright protection. Please click the link below to view the guide.