
Call of Duty: WWII
90 Achievements
3,000
99-130h
Kingfall
In The Frozen Dawn, defeat the ancient evil. Details for this achievement will be revealed once unlocked
150
0.05%
How to unlock the Kingfall achievement in Call of Duty: WWII - Definitive Guide
Conceptually speaking, this easter egg is the most straightforward in the game, the only real challenge is an annoying and difficult boss fight at the end. It can be done with any number of people. As per usual, the more the merrier. Solo... good bloody luck. I did this with 4 people, and I'd suggest you do the same. In terms of loadout, I'd suggest you rock a max ammo and full specialist meter for the boss fight, as well, you should bring an M1 in as your starting weapon, upgraded she's deadly AF against the boss. I'm writing this guide assuming you know the map layout, where the perks are, etc.
Step 1: build and upgrade all 4 wonder weapons
This is the whole easter egg. There are 4 build able wonder weapons which can be upgraded through further means. Once all 4 are built and upgraded, you can immediately go into the boss fight. These things vary a ton in difficulty, but I'll explain how to do each one. Bear in mind that each thing can be upgraded simultaneously, and for the sake of getting this done on as early a round as possible, it is advised you work on these all at the same time. I'll be listing these upgrades sequentially however, so let's just jump into that.
The Broken Flail
1: Find some books
Super simple, 2 books around the map in different spawns
1. Overlook – Stand on the blood bridge and face the Ice Caves. On the right, there’s a very well-hidden book to the right, behind the octagon-shaped stones.
2. Passage – On the floor of the passage, near the fast-travel chamber. Just move along the walls and hold interaction. You’ll grab it.
3. Morgue – Find the cliff that drops down to the Phylactery door. It might appear here.
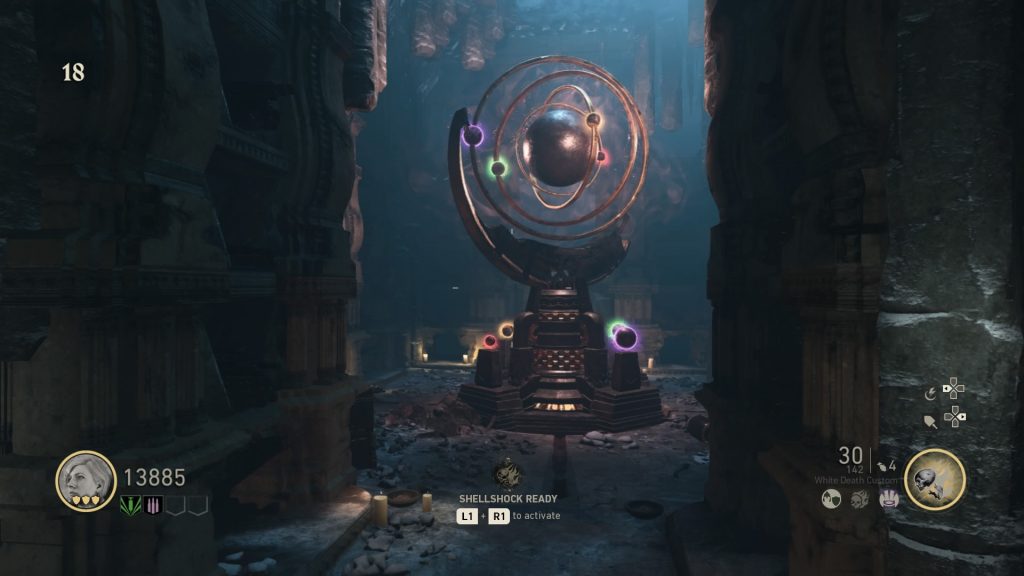
With the two books, you must place them in the Thulian archives (underneath that big solar system thing)
2. Find some gears
Again, just finding 3 gears around the map, this map is CRAZY!
1. Passage – In a small alcove, right next to the Gearworks door.
2. Blood Altar – Along the outer edge, near the Blood Altar itself / Mystery Box.
3. Thulian Archive – Inside the Cypher Room itself. There’s always one inside.
4. Overlook – To the left of the stairs to the Phylactery.
Grab all 3 and head underneath the solar system statue. The gear system is very obvious, throw the gears in her.e
3. Charge the orrery
Now, brace yourself, this next step is whacky. Go upstairs and kill some zombies to charge up the orrery. Isn't that nuts? After the orrery stop accepting souls you are good.
4. Solve the orrery puzzle
This thing is just stupid. To the poor sod who's job it is to do this, I'm sorry. The solar system thing will be spinning and you will see the corresponding planets lying around it. By holding
Your goal is to have these rotating planets in a specific orientation. What orientation? Well, if you head from spawn towards the orrery, turn right just before the stairs and you will see a figure. You must align your planets to correspond with this, but orienting yourself is a nightmare.
The North side of the orrery is represented by the half ring containing all other rings. Looking at the orrery from the top of the stairs leading to spawn it is on the left side. It looks like the little thingy holding a globe, a big piece of metal, it's fairly obvious. This thing represents the TOP of the cypher giving you the you the correct orientations. So you need to do some serious mental gymnastics to orient yourself so it all works. In terms of specificity, there is 8 points you can stop each planet (so at 45 degree increments). It takes practice and a keen eye to get this figured out. You can try as many times as you want, when you input the wrong orientation the planets just start spinning again.
If you eventually manage to get all the planets aligned properly, you will unlock the broken flail. Go ahead and grab it, you will need it later.
5. Constellations
With the broken flail, holding
There will be a single constellation in the sky in one of a series of spots.
-spawn (left and up when looking at the entrance to the map)
-Blood altar ( a number of spots, look in the sky)
-The orrery itself (hard to see, look towards the ceiling above the orrery)
-Behind schildblist (look out the window)
While in the vision mode, aim your cross hair at each star until the constellation forms. When you get the first constellation, simply head back to above the orrery, and kill 3 more zombies with the knife over the middle raven symbol.
Star gaze a second time, the locations will be the same but the constellation won't be in the same spot. Kill 3 more zombies above the third symbol and star gaze for a third time. Afer this 3rd constellation, you are ready for the challenge. (So it is 3 instances of charging the symbol with 3 kills each, and 3 instances of stargazing).
6. Flail challenge
This is easily the most difficult of the 4 challenges, the other 3 weapons are brainlessly simple, but this one takes some skill.
To activate the challenge, throw your teleport ball into the large central globe of the orrery and teleport inside.
You'll have to pick up the flail when you enter, use it to kill some zombies initially, super simple, but then you need to dodge a wall of fire. Once all the zombies are dead, on one side of the room, you will see a column of fire appear and move towards you, you must use your teleport ball to teleport around it, which is very difficult. The fire instakills you regardless of armor. The strategy is to back up to the far end of the area (opposite where the fire spawns), throw your ball to the other side as far as it will go without falling off, wait until the fire is right in your face and teleport. It takes a fair amount of finesse, you may feel like you totally nailed but still fail, it's super annoying. If you do down on this flame, it is best if you just bleed out, you want to save those elf revives for the boss fight.
After the first fire wall, you will have to kill more zombies and then face a second identical fire wall. Same idea. If you down on this fire wall, you will have to use a self revive because of an unfortunate glitch (which may or may not be patched now). If the fire wall downs you, you will be teleported out of the ritual room before you bleed out, you can be revived, and it will say you completed the trial. But, the upgrade flail will be unobtainable, meaning you can't finish the easter egg. It's an annoying glitch, because it forces you to waste a self revive if you down on the second fire column.
If you manage to get out alive, you will have upgraded the broken flail. This thing is not great at killing zombies, but, everytime you do a charged melee, you get a point of armor, which is incredibly valuable.
Thulian hammer
Probably the easiest to build and upgrade.
1.Grab the battery
To start, you must grab a battery located in spawn, the center in some debris. You move super slow with this thing. You need to move it all the way to the blood bridge and place it in a large black cauldron facing towards spawn.
Now, you guessed it, charge that sucka up with zombie kills nearby until it stops accepting charge.
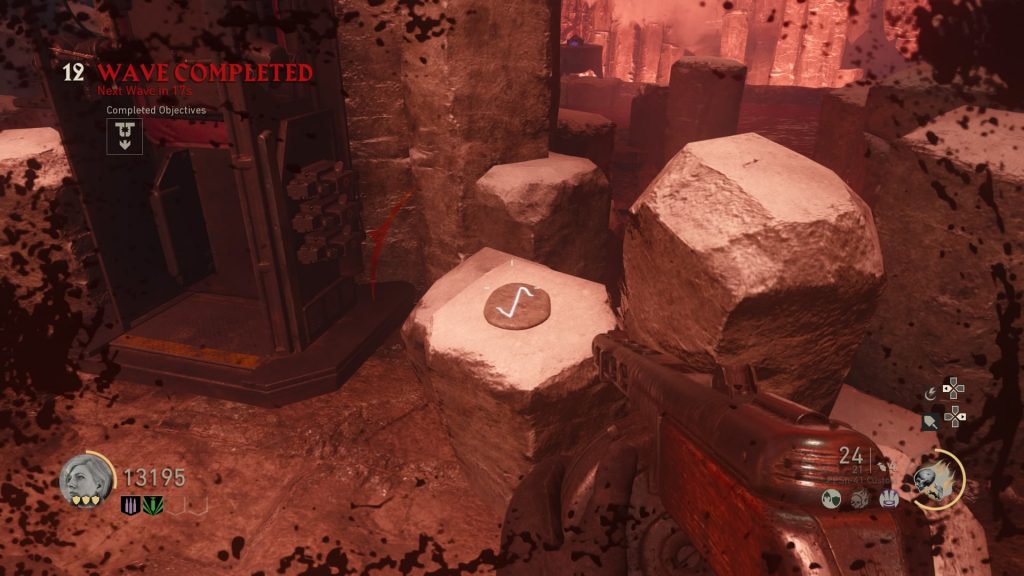
2. Grab stone tablets
Super easy, 4 stone tablets with definite spawns
-Ice Caves – Find the three weapon slots with a view of the volcano in the ice-cave. Look just to the left of the right-most slot.
-Orrery – Right of the Schnellblitz machine.
-Morgue – On the stone pillar behind the Armor machine.
Blood Altar – Just across from the Kugelblitz machine.
Grab all 4 and place them in the center pillar thing on the side facing the battery. They will appear on the OPPOSITE side of this wall, so you need to go the other side of the pillar thing and you can get a look at the purple glowing symbols.
3. Charge the tablets
Looking at these runes, see what the order is. You will see matching runes surrounding this central hole which houses the armor machine.
You need to input these 4 runes in the order outlined by the runes you placed inside the hole (from left to right). To input a rune, you must kill a zombie standing right beside it, fairly simple.
4. Pillar puzzle
This puzzle can be a doozy. On either sides of the battery are 4 large pillars. Shooting the 4 sections of each pillar will rotate them. Your job is to have the lightning symbol for each spinning section aligned for all pillars. You can try and figure it out, or use this spreadsheet I found, all credit goes to reddit user u/TheDrShow.
https://drive.google.com/file/d/1nkOR6SCcu5GO-rEfMMsPcFQA_8C...
To use it, you will need to download the spreadsheet and edit it. In the top chart, you want to input the number of rotations it takes for the specific part to rotate so it is facing forward, they rotate anti- clockwise when looking from above. The spreadsheet will calculate however many times you need to shoot each block to solve it. If that makes no sense, this video by the guy who made the spreadsheet explains it well:
When all 4 are solved, you are done.
5. Chasing the hammer
You now need to find the hammer. It will be somewhere along the loop of the map, it is super obvious and floating with a purple effect around it. When you find it, don't run up to it. Go prone and crawl up to it, stand back up when you are underneath. The hammer will "run away". Keep chasing it until you get it to go on the blood bridge, where it will be shocked and can be picked up.
6. Rune run
With hammer in hand, head up to spawn. If you hug the right wall coming out of thule, you will see a small glowing purple rune on the ice wall. If you smack this will the hammer, you will electrify your hammer for a few seconds. You must quickly run this electricity to the next rune, which is right as you enter thule, on the left wall.
Smacking this rune will cause it to glow permanently. You must now do the same thing again. Hit this second purple rune to charge your hammer and run to the morgue. On the left wall as soon as you enter the morgue is the next symbol, same deal, smack it.
When this symbol is purple, smack it and now you need to run to the phylactery. Right as you enter the phylactery there is a symbol on the ground. You must kill a zombie with the purple charged hammer on this symbol. This takes coordination with your team, they must train zombies on the symbol in wait for you.
Once killed, you must act quickly. Switch to a different weapon then switch back to the hammer, it will be purple. Run to the right and enter the blood alter area. As soon as you enter, there is another symbol on the wall near the floor, smack it to reveal a puzzle.
If you fail here, you can lead a single zombie onto the symbol you killed one on, switch to a different weapon and swap back to the hammer to grab the purple charge, and try and hit the final symbol again.
7. Another puzzle
Where you hit the last symbol, there is a wall puzzle on the wall. This one is tricky, you need to shoot specific blocks to rotate them in order to make the whole section of the wall have a raven symbol. The following is a solver for you to use. Simply shoot the listed panels in numerical order. You must solve the wall 3 times
8. Stormraven trial
Fairly simple, but a little tricky if you don't know what you're doing. Head to the blood bridge and look out towards the abyss. Now, if you did the previous puzzle, you will be able to walk out over the abyss and float. You must be holding your hammer. Move very slowly and just float forward. Eventually you will be teleported to the trial. It is possible this part just screws you over, because I have walked off the blood bridge to my death at least a couple times, so just hope that doesn't happen.
If you manage to fail the trial, we can't be friends, because a chimpanzee could do this. Grab the hammer, smack some zombies and eventually some zombies with a purple shield will show up, you need to throw your hammer at them with
You'll teleport out with the upgraded hammer in hand.
Thulian scythe
1. Activate the ancient forge
Fairly simple, but you might want to have purchased some armor. The death raven forge must be activated in the phylactery, it is sitting on an altar near the entrance to the morgue. Doing so will trap all players in this room with scary burny fire. You must simply survive for about 30-45 seconds. Zombies infinitely spawn, but you don't need to kill them, killing them can advance the rounds, so you might want to avoid that.
After enough time the zombies will despawn and the scythe can be grabbed from the altar.
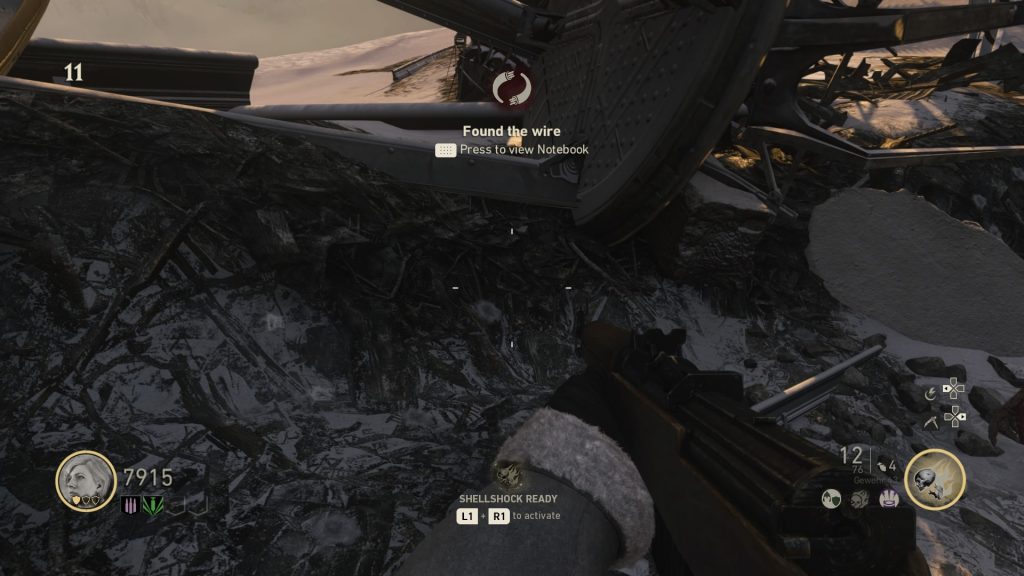
2. Spine and wire
Grab the wire, it spawns in the spawn.
The spine is a little more tricky. You need to kill a white guy zombie (the speedy bois who succ the other zombies) with the scythe and hold
3. Forge that guy
In the phylactery, head up the stairs to the bone altar and place the spine, wire, and scythe on the bone alter. Now, believe it or not, you need to charge up the scythe with zombie kills, they must be killed at the top of the stairs, where it is tight, and anybody can kill them. Hopefully it is a small round. Once fully charged, all you have to do is wait 2 rounds, for whatever reason.
4. the trial of the scythe or something
Grab the charged scythe, and enter any fast travel point with it equipped. You'll enter the trial. Just grab the upgraded scythe and kill everything, they throw all types of enemies at you, but the upgraded scythe will just mow through them all, so it's pretty hard to screw up. After killing everything, you'll teleport out. scythe in hand.
The shield of shieldness
1. Filling blood pools
Basically on round 1 or 2 you can start on this, you must simple charge up blood pools in 3 locations around the map by killing zombies on them, how fun!
-As soon as you enter Thule bear left and on the left wall there will be blood pool cut into the wall, the rest all look like this
-Enter the morgue and bear left, cut into the wall, can't miss it.
-On the blood bridge, head up the stairs towards the orrery, look to your right at the top of the stairs. You need a tablet before these will count. This tablet is located on the bottom floor of the morgue on the right side of the alcove filled with bodies in jars. Place the tablet on the blood pool.
So kill about 5 or 6 zombies in each blood pool to fill them, the zombies must be standing basically on top of the small pools for the kill to count, but it will be a very early round so it's easy.
2. Killing shield man
If you head into the blood altar room, a wustling with a shield on it's back will spawn. Just kill him. He is impervious to damage in the back due to the shield. You can honeslty just knife the crap out of him. He will drop the shield for you to grab on death.
3. Charge the blood pools again
Recall the order you did the blood pools in, you probably went: ice caves, morgue, blood bridge, since it is most logical. You need to charge the blood pools in the SAME ORDER. If unsure, whoever is holding the shield can look at a blood pool and there will be a red mist on it, telling you this one is next.
You need to kill a fully charged white guy on the blood pools (in the correct order). A white guy will become fully charged after he eats around 5 zombies, and will begin glowing red and attack players (he will only attack when charged). So lead him onto the first blood pool and smack him with the shield so he dies on the pool. His explosion will either knock you down or take an armor, so either run the hell away or face your shield at him and hold
Remember, every time you teleport (which you need to do 3 times to unlock pap) you will spawn 2 white guys. Kill one, and let the other one chow down (make sure you kill the other one with the scythe if you haven't already). So you can easily get enough white guys by just unlocking pap.
4. explode the thing
In spawn, there is a large door which you must explode. There is a faint sound of a radio when near it. You need to allow a bomber zombie explode near this door. This is easier said than done and seems kind of broken. It seems like the only way it works is if you lead the bomber guy so he approaches the door from the right side, it seems to work most of the time. Make sure you let him damage you as well, it won't take an armor away.
You can grab a radio and this other device. Place the radio and other device on two pedestals around the blood altar. Doing so will cause the blood in the altar to start making distinct patterns. By holding
5. Matching the patterns
You must make sure this is done in the order you originally filled the 3 small blood pools (same as the order you killed the white guys). If you look in the blood pools, they will be showing an undulating pattern in the blood. You need to look at the patterns in the blood in the order you did and remember it, then you must input these patterns in the correct order into the large blood pattern.
To input a pattern, you must kill a single zombie in the blood pool. Matching the pattern takes some practice as they are not very distinct from each other. So hit the radio until the pattern matches that in the first blood pool, kill a zombie in the blood, and repeat with the other 2 symbols.
This might take you a long time to figure out your first couple of tries, but after some practice you will be able to recognize the patterns.
The large pool will begin quickly switching between different patterns once you have inputted all 3 patterns.
6. kill yourself
The guy holding the shield needs to simply down in the blood altar pool. You can either kill yourself with grenades or let a zombie down you, you always get full armor when you exist the trial, so don't worry about losing armor.
The trial here is very simple. There are a number of wustlings which you can quickly dispatch of with the upgrades shield. After they're dead, a kind of sun looking thing will spawn outside the playable area. You must face the sun symbol and hold
You'll teleport out, and the upgrade shield is yours.
Step 2: The boss fight
With all 4 upgraded weapons, you are ready to enter the boss fight. Head to the ice caves and you will see some altars you can place the weapons in. Some dialogue will play, and you will be able to grab the weapons again.
This boss fight is pretty challenging so you'll want to be well geared up.
Full perks and shields, an upgraded m1, and possibly an upgraded sap 9mm. I also suggest you hit the box until one person gets jacks. It seems to me like you can't have more than 1 person with jacks in a game. My group hit the box probably 40+ times and couldn't get a second jacks, so don't waste your money.
To enter the boss fight, you must head to the elevator which is on the right side of the ice caves. All players must be holding a special weapon to enter.
This fight is kind of a disorganized and jenky mess. The way the fight is set up, it would seem like you need to do certain things to damage the boss, but (unless he's flying from one point to another) you can always just damage him. Zombies and wustlings and all sorts of stuff spawn a bunch, and they are a big threat. The area is quite large, so you have room to move.
This boss fight consists of stages. For the majority of the time, just run around and shoot the boss. You will see that killing zombies near one of the 3 large blood pads will charge them up, but it doesn't seem like this does anything. When you have done enough damage to the boss, he will float to the center and these symbols will shoot blood at him which heals him. You must quickly shoot these symbols to stop this. He will fall do the ground here and you can really lay into him.
I suggest somebody has a free fire equipped here to devastate him (aim for the head) during this part, throw a jack here as well. You can actually do enough damage here to bypass the next sequence completely, where he will stand up and basically begin healing with the altars almost immediately. But, be warned. It seems like with enough damage you can glitch the game, this happened to my group once, where the boss went invisible and didn't move, and we couldn't progress with the fight. I think this is very rare, but be warned just in case.
As the fight goes on, he will get new attacks. He will throw out purple shields on to the zombies which makes them invincible. The hammer can be thrown to remove the shields, but, of course, this doesn't do much since you're basically just shooting the boss the whole time.
Perhaps his most dangerous attack is when he throws a beam of fire at you. This is signaled by him first giving you the big succ into the center, and then he goes to his throne. He will throw a wall of fire at you, this will kill anybody it touches. The only way to stop it is to have the guy with the flail teleport over the fire and do any damage to the boss from here. They are tasked with literally saving their entire team, because if they down or are not fast enough, everyone will down, so no pressure. I should mention the shield can be used to keep you alive through the fire by blocking it.
Apparently, he can also spawn a sun type symbol just like in the shield trial. The shield person can stand on a blood pad and block the sun, which will protect everyone on the blood pad from it (so everyone must stand on the pad). I have actually never seen this attack, but apparently it's a thing.
And that's basically the boss fight. Remaining mobile and making sure you utilize your special weapons is key. You will want to use your special meters as well in good opportunities, infinite ammo is great when the boss falls down, as well, you can use the one which attracts zombies to you with an upgrade to give a damage boost to your whole team. Teaming up and punishing him while he's down is the key part of this boss fight, it can make it go very fast if you utilize your specialist meters. The longer you are in this fight, the harder it gets, and the greater chance of dying by one of his BS attacks, so speed is key.
When the boss is finally defeated, a cutscene will play, but you're not quite done. You will spawn back into the boss fight and must spray the boss down. No zombies spawn and he won't attack you, so I don't know if you can even fail here. Once he's finally dead, you will pop this achievement.
Conclusion
Hopefully, with this done, you will be at 100% in WWII, congrats on that or whatever. This easter egg is actually pretty simple until the boss fight. When you know what you're doing, you can zoom through it really fast. It took my group a number of tries to finally beat the boss, so it's not likely you nail him on your first try. Learning his attacks is key. As soon as we had 4 guys we got it first try (compared to the number of tries we did with 3), so you will want to find a large group.
If you have an questions, or ways to improve this guide, feel free to let me know.
Good luck!
This is a good video for the easter egg if you prefer a video over text, all credit goes to MrDalekJD on youtube
This trophy is for completing the Easter Egg of the map. Luckily, the steps for this are incredibly easy:
Step 1: Obtain all 4 upgraded raven weapons.
See the respective trophies for how to get the upgraded weapons.
Step 2: Place the weapons into the Ice Caves pedestals.
You will have seen these pedestals every time you entered this area from spawn. The Shield goes into the floor at the front, and the other weapons go into the slots in any order. Once they are all placed, you’ll hear some characters talking, and the teleporter near the Morgue entrance will open up. Take this to the Boss.
Step 3: Boss fight!
You will see a cutscene and start the fight against the God-King. Here’s what you can expect and what to do:
He will fly around the arena, having an invincibility barrier whenever he moves. Shoot him until he goes into the center and tries to power up on the plates below.
When he tries to draw power from the plates, shoot the 3 plates with your weapons to make him fall, then shoot him while he’s down. The next phase will begin and a Max Ammo will spawn.
The next phase he has an attack that drains your health if you stand in the open. Whoever has the Shield can block this attack with  , the others will need to hide behind the ice pillars. Repeat the same strategy again until he goes down again.
The next phase, he spawns zombies with purple shields, so you need to use the Hammer to take off their barriers while you attack him. Or just ignore the enemies and focus on him. Do the same as before.
The final phase he spawns a giant wall of fire that will instakill you. So like the other trials you’ve done, this time equip the Flail and teleport past the firewall and shoot the boss to make him stop. Then repeat the same strategy until he goes down a final time.
Once this phase is done, he will go to the throne and suck you in, taking off all your health. This concludes the battle and a cutscene will play. After the scene is over, he will fall in his chair and die, and the trophy will pop!

PS At first I thought it was the most difficult and impossible boss



 Mild Gonolini
 TrueAchievements
 Resolute, PotentDelusions, Jerry, Appleby, T
 stratege.ru